


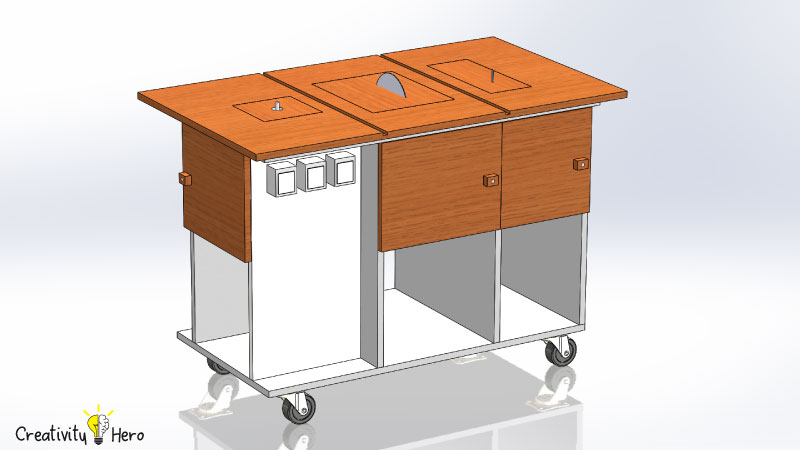
In this video I’m going to show you how I built my 3 in 1 multipurpose workbench.
I’m going to show you how I turned my router into a router table, my circular saw into a table saw and my jigsaw into an inverted jigsaw. Also, I’m going to show you how I collect the dust from these tools. And at last I’ll show you how I connected and wired everything.
I dedicated almost a month in designing and building this multipurpose workbench that will ease my future projects.
In this video I explained everything step by step, so it would be easier for you to build one on your own. Below you can find a FREE PLAN with all the details included.
You may also like: How To Build A Wooden Desk Lamp | DIY Project
So, let’s get started!
Here are the materials I used:
- 2 sheets of plywood 122 x 244 cm, 21 mm thick (your local hardware store)
- Full overlay cabinet hinges
- T-nuts
- Pocket hole screws
- Caster wheels
- Wood glue
- Paint
- Walnut wood stain
Types of tools I used:
- Jigsaw
- Circular saw
- Router
- Cordless drill
- Random orbit sander
- Pocket hole jig
- 90 degree angle clamps
- Wire strippers
- Forstner bits
- Rasp
Disclosure: As an Amazon Associate I earn from qualifying purchases.
Here you can download the FREE PLAN:
In my next videos you can find some accessories that I plan to make for this workbench like: Table Saw Fence, Crosscut Sled, Miter Gauge, Featherboard and Push Stick. I’ll upload free plans for the accessories when I build them.
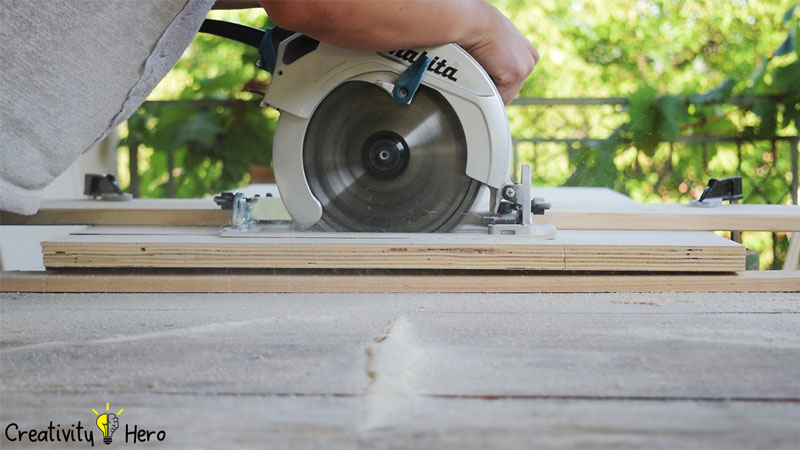
Step 1: Measuring and Cutting.
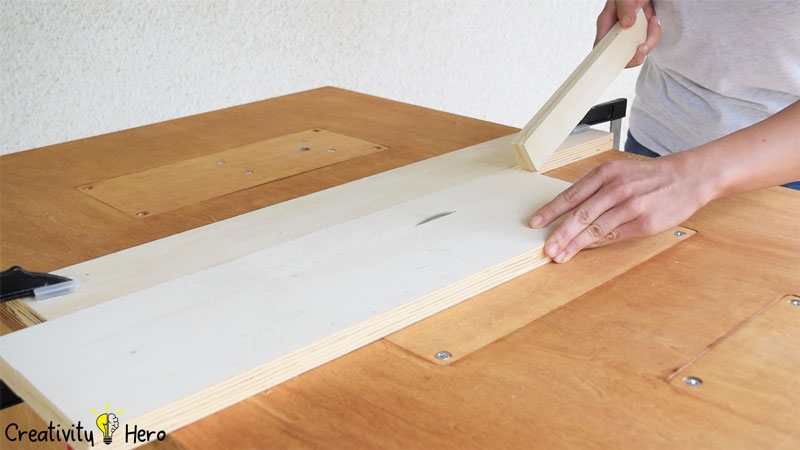
For this project I used 2 sheets of plywood, 122 x 244 cm, 21 mm thick. First I marked all dimensions. I used a wooden strip as a fence and clamped it down. Also, I placed the sheets onto 2 tables to prevent the wood from splintering.
I cut all the pieces that I need for this project: the top, the bottom, the sides, the inner panels, the doors and the frame.
Step 2: Assembling the Workbench.
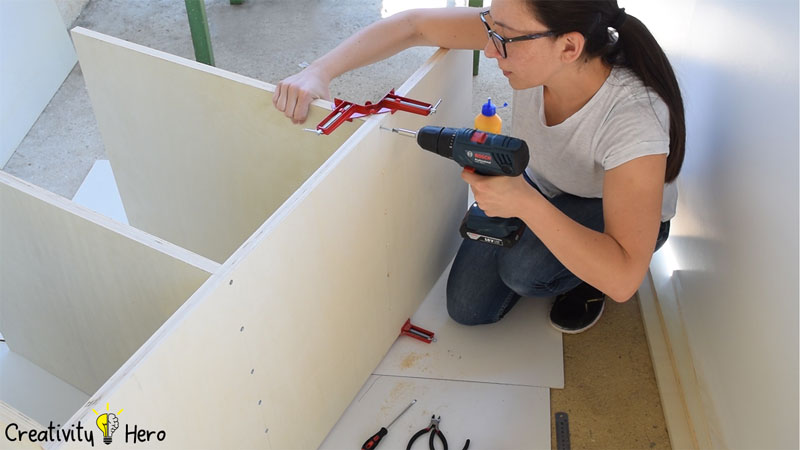
I’ll start with the bottom, and I’ll attach the sides to it.
To make the sides perpendicular with the bottom I’m using corner clamps. On the bottom of the table I’m marking the points where I’ll drive the screws in, and then I’m drilling some pilot holes in there. After I made the pilot holes, I decided that it is much better to strengthen the joints with a wood glue, and then to drive the screws in. I’m using 5 cm long screws with 4 mm diameter. I repeated this process with the other two panels which are parallel with the first one.
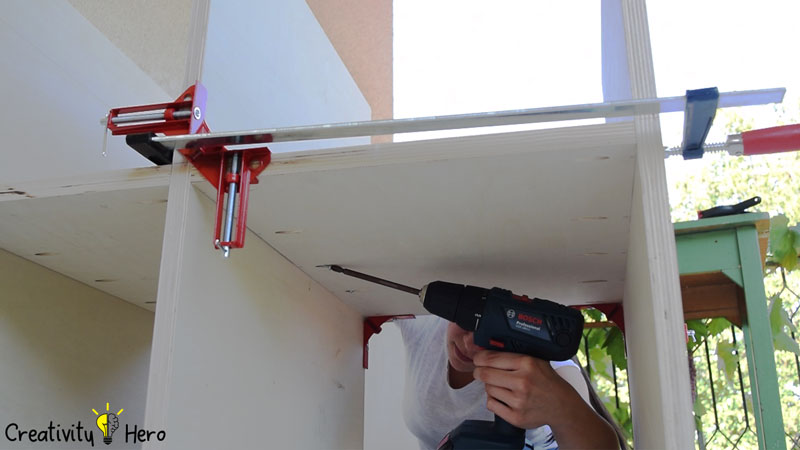
Now I’ll attach the shelves. To do this, I’ll make pocket holes with a pocket hole jig on each shelf. This is the most appropriate way to give the table a cleaner look.
I spent some time measuring and clamping them down with corner clamps, and then I drove the screws in. For these joints I’m using 4 cm long screws.
I can move on to attaching the other two panels which are perpendicular with the other panels that are already attached to the bottom of the workbench. One more thing I need to do is to attach the last shelf with pocket hole screws as well.
Step 3: Turning the Router into a Router Table.
The first tool that I’m going to attach is the router. I measured the size of the opening, found its center, and drew a square on the panel that I need to cut with a jigsaw.
3.1. Making the Opening.
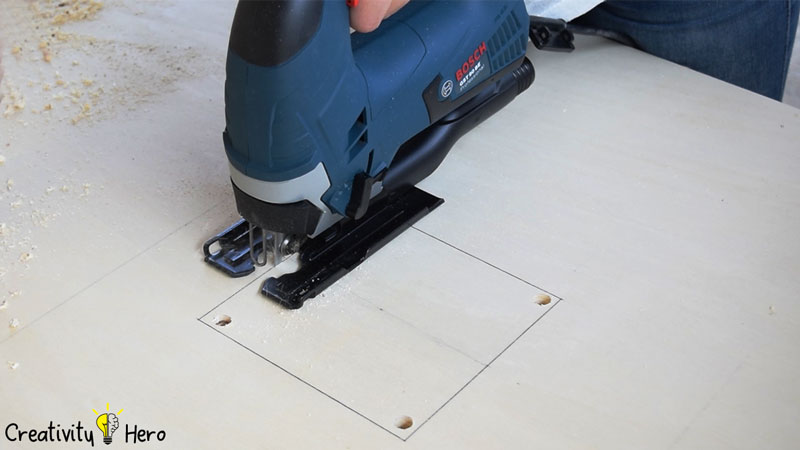
Then I drilled out four holes, one in each corner to pass the jigsaw blade through. These holes will be starting points for the jigsaw. While cutting you should try to stay as close to the line as possible.
I’ve cut the opening and used a rasp to remove all the extra wood that I couldn’t cut with the jigsaw.
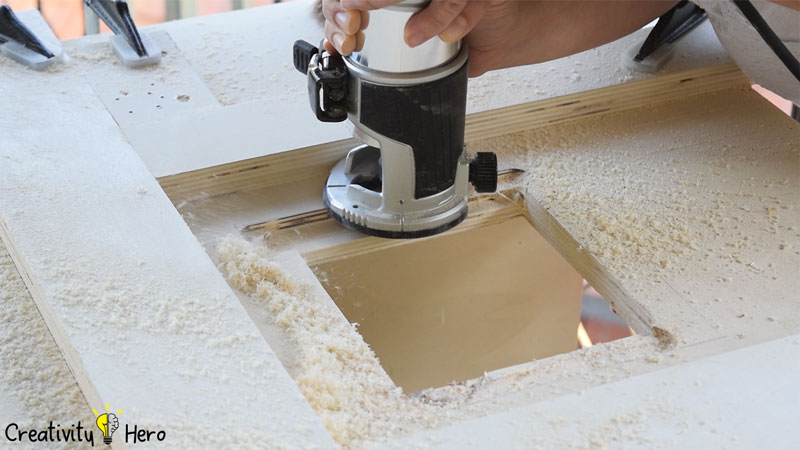
Next, I need to make a rabbet for the insert that will hold the router from below. I’m drawing the perimeter of the square that I need to cut. To follow the line of the perimeter I clamped down a few pieces of scrap wood.
I’m using a straight 12 mm bit to route this section out, but I set the depth of the cut on 5 mm, so I need to pass twice on the same surface to get the 10 mm depth.
3.2. Creating the Inserts.
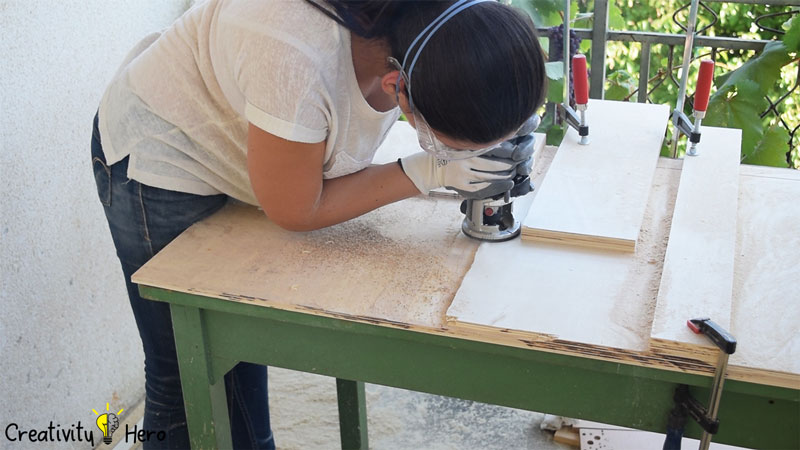
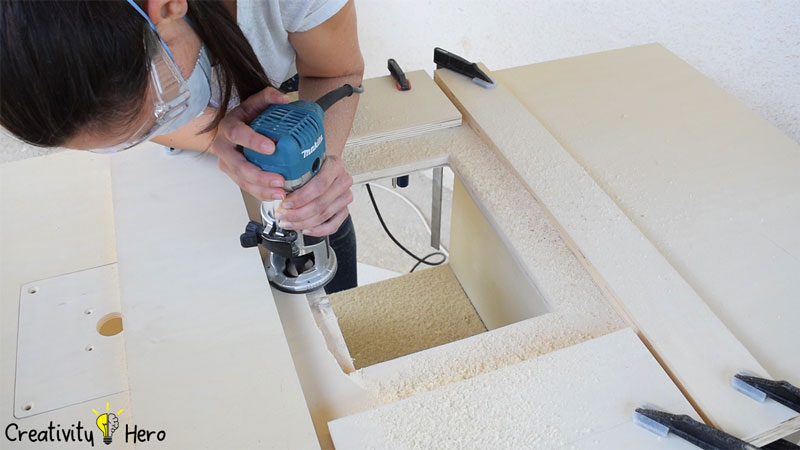
Now I need to make the inserts for the tools. The rabbet that I previously made can fit 10 mm thick insert. The problem is that I don’t have 10 mm thick plywood, so I need to find a way to solve this issue.
The only reasonable solution was to turn the 21 mm plywood board into 10 mm board with a router. So, I did it. I removed 11 mm off of the plywood. Although I was all covered in dust, I finally got 10 mm board which was one of the most important parts of the project.
The easiest way to get 10 mm thick plywood is, of course, to buy it, but I wasn’t able to do that, so this solution wasn’t bad at all.
Before cutting the inserts, I sanded the board down to make it nice and smooth. Then I cut the insert for the router and used a sandpaper to make round edges.
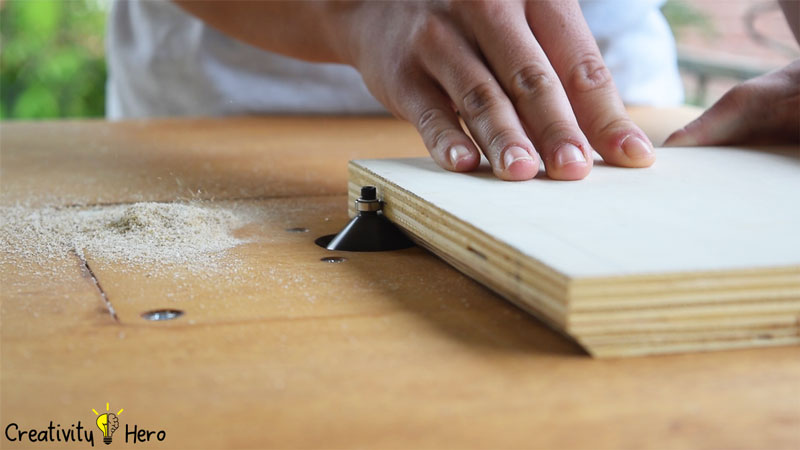
3.3. Attaching the Router onto the Insert.
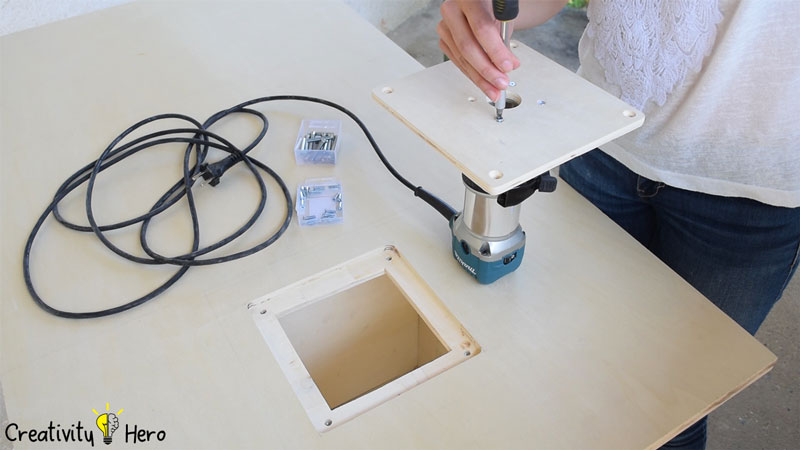
Next, I removed the base of the router and I used it as a template to mark the mounting holes.
Then I drilled the holes out. First I used a countersink bit to drill out the holes just enough to get the screw heads to sink below the surface of the wood. That’s because I need the insert to be flush with the surface of the table. For the router, I made holes with a 4 mm bit, and for the insert I made 6 mm holes. Also, I used a 35 mm Forstner bit to drill out the center so that I can easily move the router bit up and down.
The last 4 holes I drilled with an 8 mm bit into the corners of the rabbet. I installed the T-nuts below the surface, so that I can secure the insert in place. I’m going to use a clamp which will pull the T-nut inside the wood.
And that’s it. I’ll attach the router onto the insert, and then I’ll attach the insert onto the table.
Step 4: Turning the Circular Saw into a Table Saw.
Now, I can move on to the second tool, and that’s the circular saw. Here, I need to pay much more attention to the squaring. The saw has to be squared up with the front edge of the workbench, so I need to measure twice before cutting.
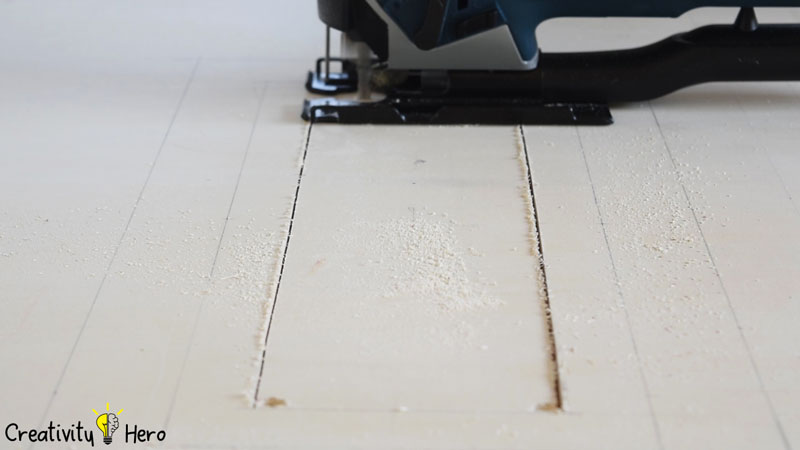
4.1. Making the Opening.
Then again, I drilled 4 holes for the jigsaw blade to pass through and made an opening as big as the circular saw. The rasp corrected all the imperfections.
Then I made a rabbet with the router, and this time I set the depth of the cut on 10 mm, so that I can remove the extra wood all at once.
Fortunately, now I have 10 mm thick plywood for this insert. So, I cut the insert to size, and rounded the edges with a sandpaper.
4.2. Mounting the Circular Saw onto the Insert.
To attach the circular saw to the insert I’m going to utilize the existing holes, two in the front, and two in the back of the saw. You may have to drill new holes in your saw base if you can’t use the existing ones.
I marked the places where I need to drill holes in the insert.
After that, I drilled all the holes I needed. I’m going to use bolts with 4 and 5 mm diameter, two of each, and also I’m going to use 4 bolts with 6 mm diameter to attach the insert to the table.
I installed the T-nuts with an F-clamp, one in each corner of the opening.
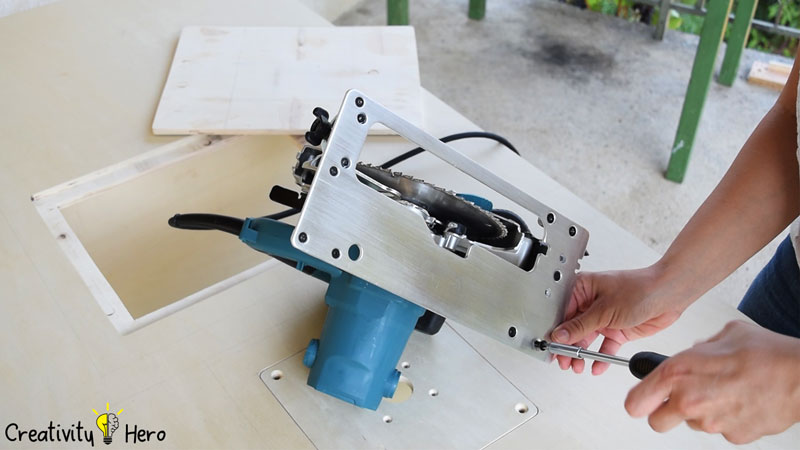
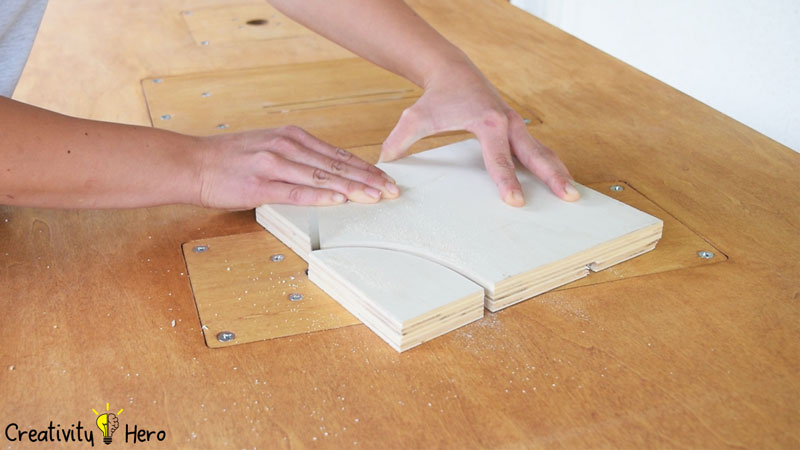
4.3. Making Cuts on the Insert.
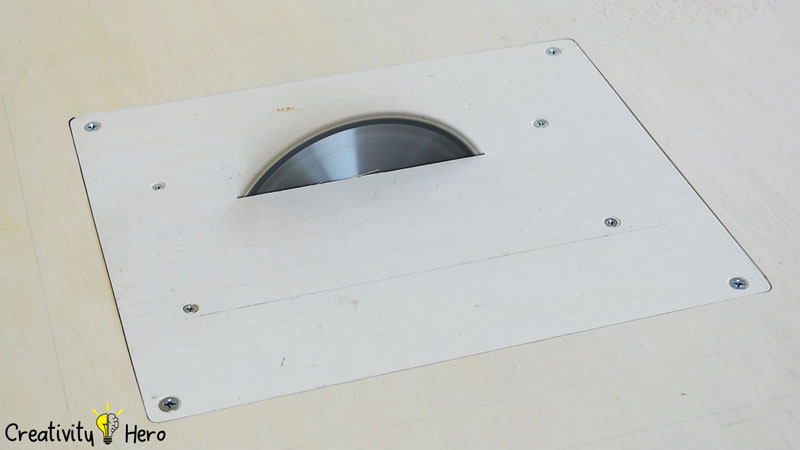
Now, I’ll place the circular saw below the top and at this point I need to make 2 cuts, one at a 90 degree angle, and another at a 45 degree angle. Before making the cut I have the blade guard clamped out of the way so that I can see what I’m doing.
So, I’ve turned the circular saw into a table saw.
Step 5: Turning the Jigsaw into Inverted Jigsaw.
Next, I can focus on the third tool, and that’s the jigsaw.
5.1. Making the Opening.
The process is pretty much the same here. In each corner I drilled 4 holes and slowly passed the jigsaw through, following the lines. Again, all the imperfections are corrected with the rasp.
Then, I clamped down 4 pieces of scrap wood, and they will act as a guide for the router. I routed the section out with a 12 mm bit.
5.2. Attaching the Jigsaw onto the Insert.
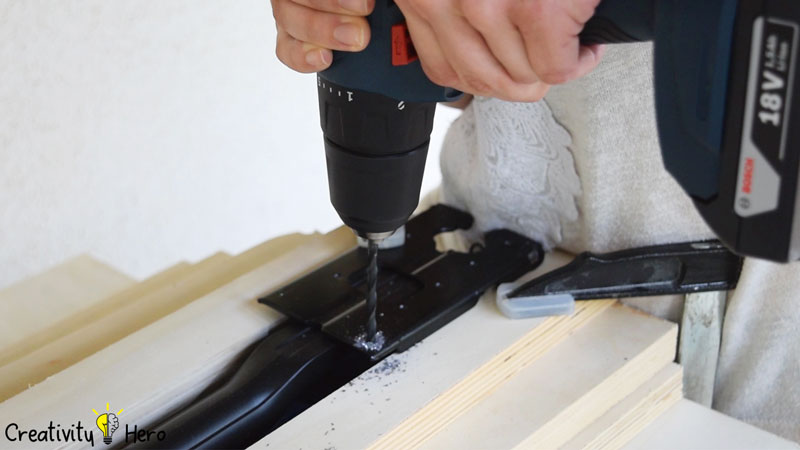
After that, I need to attach the jigsaw to the insert. And to do that I need to drill new holes in my saw base. I drilled two holes in the front, and two holes in the back of the jigsaw. To do this I’m using 5 mm metal drill bit.
Now that I have 4 new holes on the jigsaw, I can make the appropriate holes on the insert, and on the opening, and to install the T-nuts. Also, I made a 15 mm hole with a Forstner bit for the jigsaw blade.
I can now attach the jigsaw onto the insert, secure the insert onto the workbench and put the blade in place, to check the squaring. You may have a different jigsaw, so you may need to use a different method to attach it to the workbench.
Step 6: Making Holes for the Caster Wheels.
After I drew some lines, I can mark the points for the screws and drill 4 holes on each corner. I’m using caster wheels with brakes, because this way I can easily move the workbench, and I can secure it in place while I’m working.
Step 7: Attaching the Top to the Table.
To attach the top to the table I’m making pocket holes on each side for which I’m going to use 32 mm screws.
Then I’m applying a decent amount of wood glue and I’m driving pocket hole screws in each hole.
Step 8: Making a Frame below the Top.
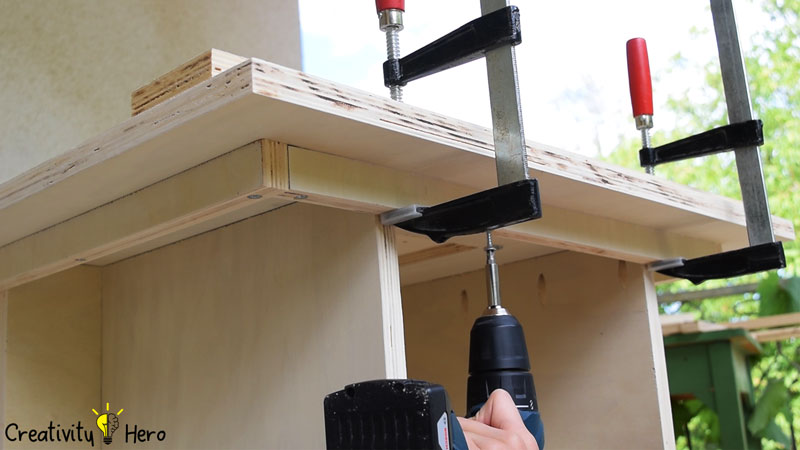
I apply wood glue on the first stripe, clamp it down and drive screws from the inside. For the rest 3 stripes I drive screws from below.
Step 9: Preparing the Doors.
Now it is time to work on the doors. I’m marking the points where I’ll place the hinges, and I’m making holes using 35 mm Forstner bit. I’m marking the points for the screws, and then I drill the holes.
Step 10: Painting the Workbench.
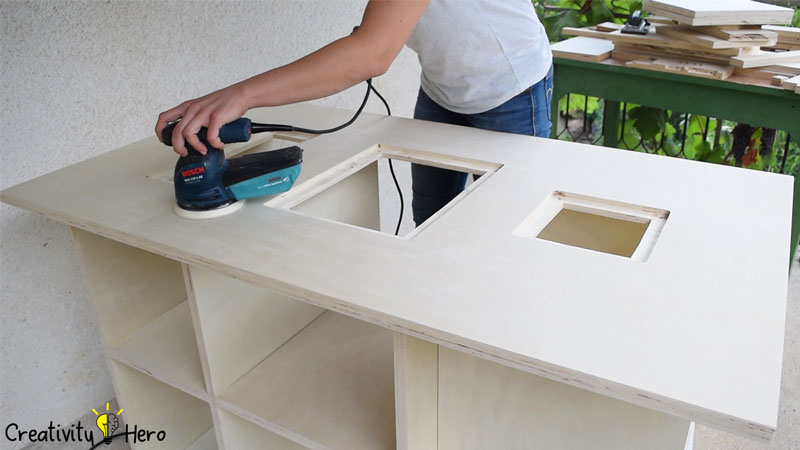
Before painting, I’m sanding the entire workbench, first with 120, and then with 220 grit sandpaper, and wipe the dust off.
I decided to finish it with a combination of stain and paint, so I stained the top, the inserts and the doors with walnut stain, and I painted everything else with white paint.
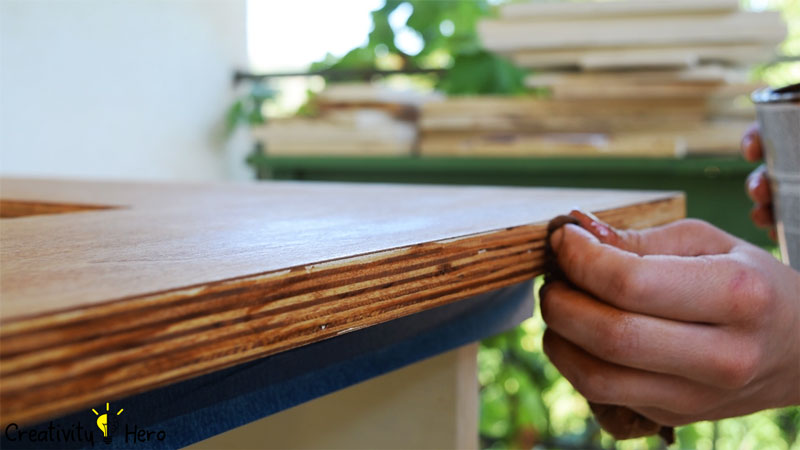
What I most like about the stain is that it emphasizes the edges of the plywood wonderfully.
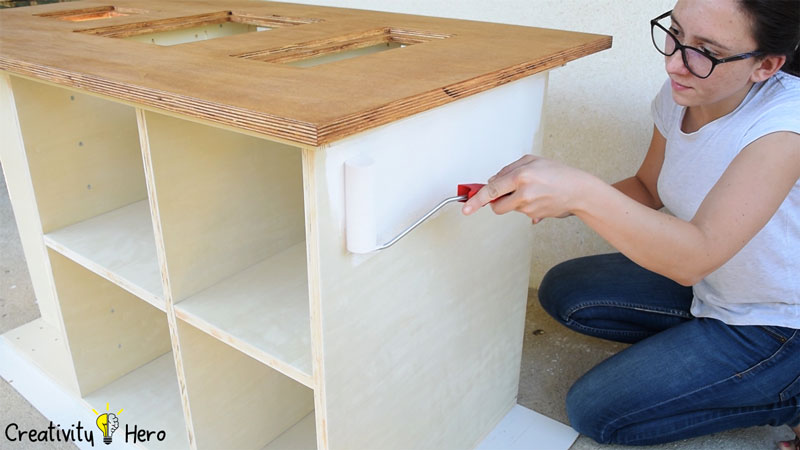
When it comes to the paint, first I applied one coat of oil-based primer, left it to dry out, and then sanded it with 120 grit sandpaper. After that, I applied one coat of white oil-based paint, and left it to dry for at least 24 hours before doing anything else.
Step 11: Mounting the Caster Wheels.
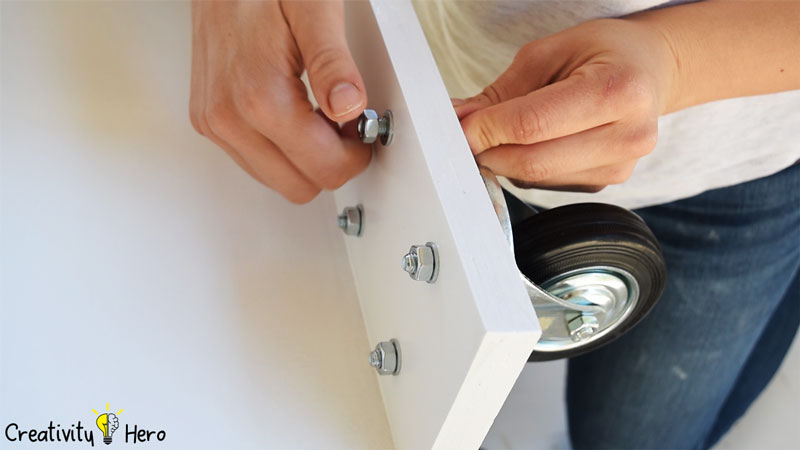
I mount the caster wheels on the bottom with 8 mm bolts, and secured them well.
You can see that the bottom isn’t painted, instead I applied transparent finish, because it dries so fast, so I didn’t have to wait another 24 hours for more paint to dry out.
Step 12: Electrical Work.
Now, I can move on to the fun part of this project: The electrical work.
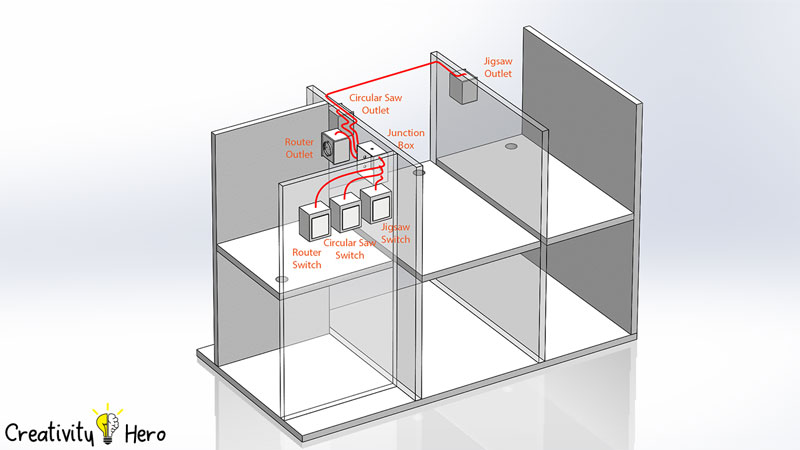
So I’ll put 3 switches in front of the workbench which will control the three power outlets for each tool, according to the circuit schematic. I’m using 3 core 1.5mm cable and I start by cutting it to size and stripping off the wires inside.
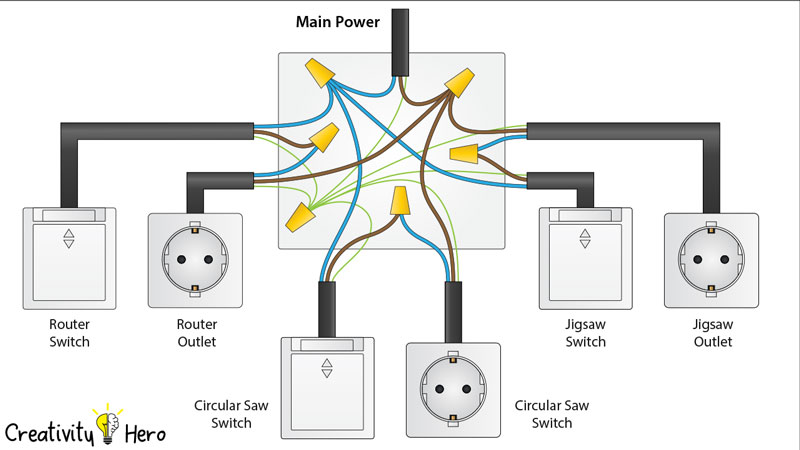
I connected the hot and the neutral lines, in my case the brown and the blue wires, to the switch in a way that they are connected to each other when the switch is pressed, and disconnected when the switch is not pressed. I attached the switch boxes to the workbench using screws, inserted the other end of the cables through the holes where my junction box will be located and assembled the switches.
On the other side, in the router compartment, I marked the position where the junction box will be placed and attached it to the side panel using two screws.
In similar way, I connected the three power outlets with the cables appropriately, attached them in each compartment and assembled them.
What’s left is to connect the main power to the junction box. I did that by using 3 m long cable on which I attached a power plug and then brought the cable to the junction box. At the end I connected all the wires together in the junction box according to the circuit schematic.
Step 13: Dust Collection.
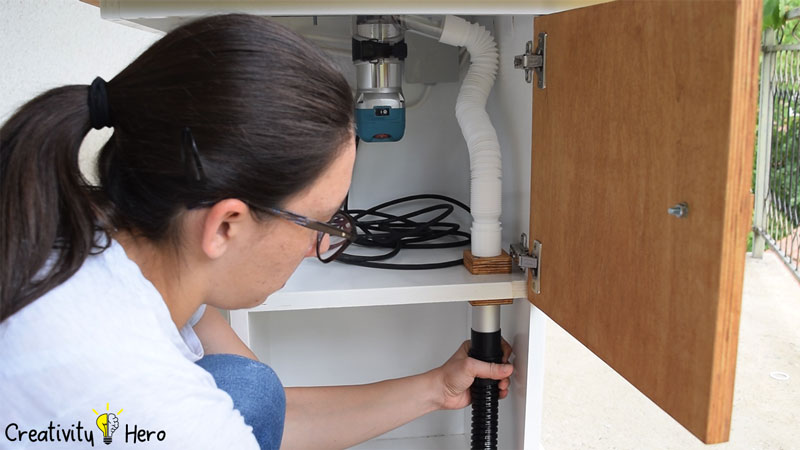
I’ve previously made squares with holes in the middle that will fit all the hoses needed for this workbench. I screwed one square above and one below the shelf, and this way I’ll connect the hoses from the tools and the hose from the vacuum cleaner.
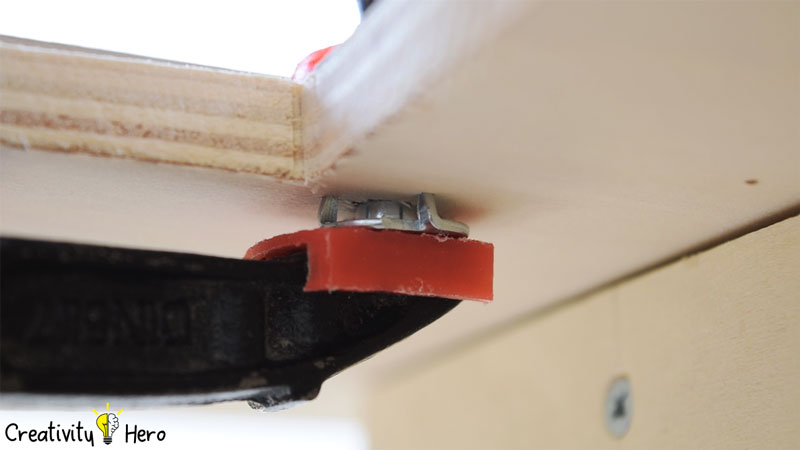
Step 14: Attaching the Doors.
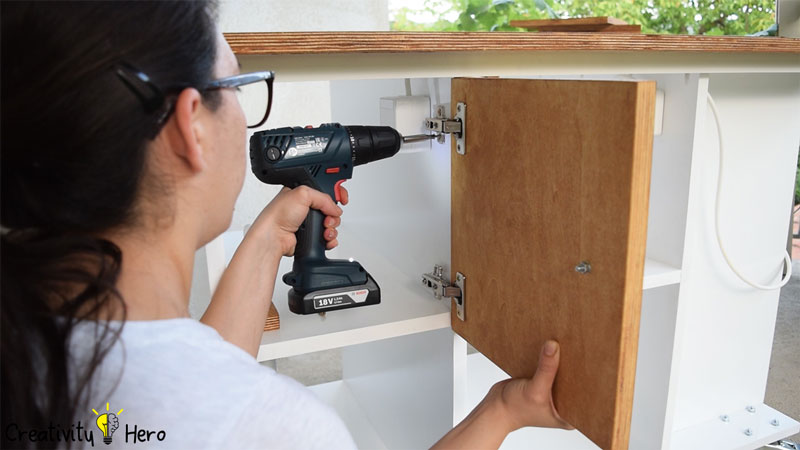
I’m using full overlay hinges. Also I made door knobs out of plywood which I mounted with screws. I kind of like the exposed look of the screws.
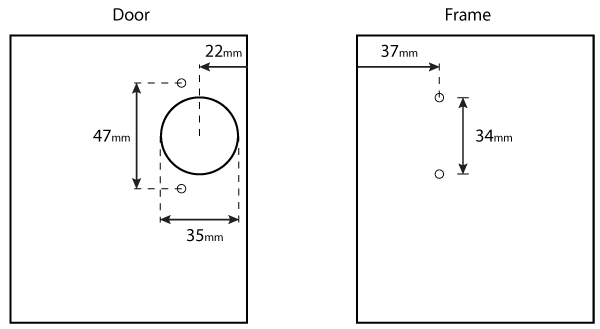
Mounting the doors on the workbench is easy, you just have to follow one simple rule, which you can see on the picture below.
I like the mechanism of the hinges, they are easy to install and adjustable, which is pretty good for people who are using them for the first time.
Step 15: Putting the tools in place and testing them.
15.1. Router Table
15.2. Table Saw
15.3. Inverted Jigsaw
At the circular saw, you can notice that instead 4, I put 6 screws to attach the insert to the top. This is because the surface of the insert warped for some reason, which I couldn’t fix, and I thought 2 more screws in the middle will solve this problem. And I was right.
You may also like: DIY Rustic Hemp Rope Chandelier for 35$
At this point I’m done with my workbench. I’m very satisfied with how it turned out. I really like its appearance and functionality, so I think it was worth every second I’ve spent on its design and building.
If you have any questions, suggestions and ideas leave them in the comments section below. Also, if you like this video share it with your friends and subscribe to my YouTube channel.

Hello this is awesome it’s exactly what I am looking for. You’re very talented. I had one question for you. What program do you use to create your drawings. Again great job.
Thank you for posting your hard work for us all.
Thank you very much! I’m happy to hear that! I use Solidworks to create the drawings in this project. 🙂
Great Job. I’m going to use your project to do my own working table. Fingers crossed 🙂
Robert
Thank you very much! 🙂
NICE. GREAT JOB DONE.
EXPECTING SAME IN FUTURE.
Thanks a lot! 🙂
Hi there! This was exactly what I was looking for! I haven´t got a circular saw. Any suggestion?? Thanks a lot! Great job!
Thank you so much! I don’t know what other tools you have, but you can use a combination of a jigsaw, a miter saw and a handsaw, depending on the thickness and the length of the wood.
Hi Marija! I’m not able to open your drawings. I do have a Mac, don’t know if this could affect… When I try to open your PDF it comes only pages and pages of code words.
Can you help me? I’m very interested in your work.
Thank you in advance.
Best Regards
I’ll send you an e-mail with the files, I hope you can open them that way.
Hi Marija,
Congrats for the great work. It seemed that I am facing the same issue here with the opening of the files. Any chance you could send them to me ?
Thanks in advance ,
Best regards
Hai I am Hari and I am from India a graduation student. I like your project but I can’t open the plan file which you have specified . Could you please tell me which software or the program can I use to read the plan.if I can get the plan detains in PDF I feel really easy to read it.because I am planing to build a machine like this
Of course you can open them in PDF, you can download the plans here in this article.
perdón pero mi ingles es muy escaso, la mesa de trabajo 3 in 1, es muy buena idea y muy practica y estética practica, la base que medidas tiene? la felicito por su tutorial y su profesionalismo.
I hope I understood the question. The dimensions of the workbench base are 114 x 59 cm.
Simply brilliant !!! I ve seen sooooo many diy projects but this one by far is the most interesting and useful !! Congrats! Keep up the good work 🙂
Greetings from Bucharest!
Thank you very much! I’m glad you like it! 🙂
Hi my name is Harrison and I’m a Nigerian. I picked up interest in wood working a little while ago. We don’t have too many wood workers here and I want to groom myself into becoming one of the best. I have always had this little fear inside me not knowing if I will be able to take on a project and completely perfectly. Watching you build this work station encouraged me to go ahead. Thanks a lot. Your project and your ability to give precise detailing is out standing. Keep it up. If it’s no problem to you I would like very much to be mentored by you. Have a pleasant day. I hope to hear back from you.
Thank you very much! I’m glad you like my work. Have a wonderful day as well. 🙂
I also just downloaded the plans and the files would not open. Too I would be very happy getting a direct copy of the files if that’s no problem as I would really love to build this project. It would help me a lot moving forward in my wood working carrier.
I uploaded the plans in different formats, so that everyone will be able to download and use them. First, you should try downloading different format of the plan, if you haven’t already. If it doesn’t work, you should download SketchUp, it’s a free open-source 3D modeling software.
hey Marija! really beautiful project you made! I like this! Can you send me this plans of this project for solidworks file?
You can download the STEP file and open it with Solidworks. If you need any help let me know.
Hi and what an excellent job you done. The files are still not downloadable?. Would you mind emailing me a copy please. This is exactly what I’m looking for in my very small workshop…once again thanks for such a good project..
The plans are still available on this article. I don’t know why you can’t download them, but anyway I’ll e-mail them to you.
I love the plans and have limited space so this will be great but I cant get the files to download for me, can you email me the plans in pdf so I can open it
Sure, good luck with the build! 🙂
Hi..Marija..thank u for sharing the free plans. Im a beginner, and hopefully this help me to start my woodwork.. Thx so much.
You’re welcome! Good luck! 🙂
Hi Marija,
I too would like the plans emailed if possible. I have tried to open the PDF and the Sketchup versions and both won’t open for me either. Watched your video, really enjoyed. Very easy to follow.
Sure, I’ll send you the plans. Thank you very much! 😀
what about when the tools are not in use. say working with the jigsaw, what happens to the saw and router. are they on raised and lowered when not in use or are they removed and reattached depending on which tool is needed
When I’m working with one tool I raise and lower the the blades and the bits from the other tools. I don’t need to remove the other tools all the time. It is so much easier and faster to work on this workbench. 🙂
Very cool, unfortunately I can’t open any of the plans
Hi, i tried everything to open the plan-files but i can’t get them open.
Greetz,
Ludo (Belgium)
I hate to cause you a time issue, however, I too have attempted to download the .pdf file, and it downloads as a .rar file. I would love to see the actual plans for this also. Thanks!
Hi, Marija. I’m Michael a wood worker too and your projects inspired me. You’re great! I’m planning to build one but I can’t open the downloadable files. I try to download those 4 files several times but its still not work. Would you mind send me the plan directly to my email?
It’s a good job, clean and precision.
J’ai essayé de télécharger les plan pour avoir une idée sur les mesures utilisé, mais c’est impossible.
Je viens de commencer je suis entrain d’acheter des outils.
Pourriez vous m’envoyer tous les plans.
Merci beaucoup
Ciao Mariya. Veramente brava. Non ho parole!!! Molto precisa e curata nei dettagli. Veramente un artista!
Non sono riuscito a scaricare il progetto. Se non ti do disturbo puoi inviarmelo nella mia mail.? questo è l’indirizzo… arteecolore.mm@gmail.com
Ti ringrazio tantissimo
Ciao Mariya. Veramente brava. Non ho parole!!! Molto precisa e curata nei dettagli. Veramente un artista!
Thank you Matteo!I appreciate that! 🙂
you are the best
Thanks! 🙂
Hello, well done. I have to thank you for this project. From Azores islands, thanks for sharing.
I’m glad you like it! 🙂
bonjour,
je ne peut enregistrer le plan dessins de plans multifonction 3 en 1 fait maison fichier P D F pouvez vous me les envoyer par courriel merci d’avance un boiseux qui serait heureux d’en faire un pour bricoler
bonjour,
j’ai oublié de me présenter je suis un français adorant le bois je voudrais pouvoir faire la table 3 en 1 multifonction pour pouvoir faire des jouets a mes petits enfants je vous félicite de votre travail et de votre partage gracieusement cependant je ne maîtrise pas trop l’ordinateur je ne peut pas enregistrer le PDF avec les cotes en métrique du plan pourriez vous s’il vous plait me le faire parvenir par courriel a mon adresse
alain.sere@gmail .com
cordialement un boiseux amoureux du bois Alain Séré
Parabéns. Muito inspirador.. obrigado.
I’m glad you like it! 🙂
Brilliant, thank you for the tutorial….I down loaded the plans, and used RAR extractor on my MAc to open the file, all good…..
That’s great! I’d like to see some photos of your workbench once you’re done with it. 🙂
For some reason it will not let me download the plans for PDF would you be able to email them to me
Enhorabuena Marija !!! Me gusta tu forma de trabajar, el banco es mas simple que otros que se ven por ahí, pero sin embargo se ve muy sólido y efectivo. Coincidencias de la vida o mejor dicho Amazon, jjj, hace que tengamos prácticamente, las mismas herramientas. Un saludo.
Thank you so much David! 🙂
Thank you Merija
Your work is awesome and I am so glad you share with us. Could you give little bit a explanation about cutting list, I’ve checked there isn’t cutting list. I’m new Comer in woodworking, need more guide for my first project woodworking. Thank you Merija for your help.
Thank you so much! Actually there’s a cutting list which you can find in the free plan in this article. It’s below the tools and materials list.
I too would like the plans emailed if possible. I have tried to open the PDF and the Sketchup versions and both won’t open for me either. Watched your video, really enjoyed. Very easy to follow.
Thank you
N l walters
Thank you very much! I’ve already sent you the plans. 😀
Hi ..very Nice design.I am having trouble downloading the PDF format file. I can not open it.
This project helps a lot of people
He helped me a lot thanks
I love him
Thank you so much! 😀
Great looking piece, i been watching so many videos on making a work bench some like this. This is ideal for me as I only have limited space and i could use this as a mobile station, but best I like on this and it is very hard to find, your giving free plans hehe,
only small issue the plans won’t download 🙁
Hi Joe! Thank you for the lovely words! I’ll email you the plans. 😀
Hi Marija
I had a look at a number of other similar projects for a couple of weeks now. I actually started on a project, but on a different design. The functionality of your design is perfect for my personal needs and have decided to start the project over, with your plans. Dust collection and mobility with the wheels just makes sense…well done.
The pdf file is in .rar format, which needs WinZip (or similar program) to extract the file. Can you kindly email me the normal .pdf file.
Cheers
Hi Japie! Thank you very much! I’m happy to hear that you can use my idea to create your own workbench! I’ll email you the plans. 😀
Hi Marija
Just wanted to let you know that after few weeks of projects searching on YouTube, I decided to follow your idea, which is the best compromise for me. I love the design, the attention given to details, and your clear explanations.
I won’t hesitate to follow up with the final result.
Best regards from Belgium, and congrats for your great job done !
Thank you Julien! That means so much to me! I’d love to see some pictures of your final result. 😀
Hi Marija
Great video and work bench. I am a fan. Like everyone else, i cannot open PDF files in any format. Can you please e-mail me files.. Thank You so much.
Hi Juan! Sure, I’ll e-mail you the PDF files.
Absolutely brilliant!! Simple and effective. Well done. Do you have any learnings after ypu built the workbench?
How can I open the sketch files?
Many thanks.
Obviously I have subscribed to your channel.
Cheers from Australia.
Estupendo proyecto, impecable trabajo. Detallista. Me encanta.
No pude abrir los planos. Podrías enviar en formato sketchup y pdf?
Gracias por compartir.
Hi Adriana! I’ve e-mailed you the plans. I hope you can download them now. 🙂
Hi Marija!! This is amazing it’s going to make my garage so much neater once I build it. Would you mind emailing me the PDF plans? Thanks!
Thanks Anthony! I’m glad you like my idea. Sure, I’ll e-mail you the PDF plans. 😀
Moi aussi, j’ai tout fait pour télécharger le fichier mais sa ne marche pas
Hi Ned! I’ve already sent you the plans! 😀
Greetings! I was unable to download the files on my Dell, can you email me the plans?\
Thanks in advance!
Hi Dave! I’ve just sent you the plans, I hope you can download them now. 😀
I did, cant wait to get started 🙂
Greetings! I was unable to download the files on my Dell, can you email me the plans?\
Thanks in advance! PDF please.
Hey This is exactly what I have been looking for. I have tried to open the files but I can’t. Could you send me the plans in PDF so that I can put this together?
Thanks,
Hi Travis! I’ve e-mailed you the plans! I hope you can download them now. 😀
Hallo Marija,
After a while I contacted you about your YouTube Channel . I am looking forward to finish my multi table saw nearly in the next fest days in my holiday. Thank you at this point for your exzellent inspiration.
I saw in your video about the crosscut sled that you using a splitter. Is this a permanent feature and how do you fix it ? I World say you use an metal angle in the same thickness as the sawblade. Is this right.? I‘ve bought the same Makita saw that you have and unfourtenately there is no splitter on board.
I‘am looking forward to your answer.
Best regards
Harald
Hello Harald,
The splitter is simple peace of ~ 1.5- 2mm tin metal plate which is attached on a metal bracket under the top of the workbench. The splitter is secured using nuts and bolts so it can be easily detached as well.
Hi Marija,
Firstly don’t worry I have the plans 😂.
Thank you so much for designing and sharing your workbench. I watched all of the utube videos but chose yours to build as the design was fantastic and the instructions clear and easy to follow. I have almost finished and am very happy with the result. I made a few small changes during the build and should be ready for a test run at the weekend. I also ordered most of the supplies through the links provided.
Well done on a great job x.
Brava Marija. excellent project. I hope one day to complete the work. I work the iron ….. no experience with wood though …..
nice job! i have the files i hope to start building soon. did you find the stricture regid?
Thanks. Well yes, the overall structure is quite rigid.
HI MARIJA,
Thank you for such a great sharing workbench ,I am 73 years old and are trying to learn as much as
I can
Please could you email the plans for creating such great workbench.
Thank you for sharing this great project.
Nick
Hey Nick, thank you! The plans are already included in the article and they are free to download. They are located at the beginning of the article where the 3D model image is placed.
Thank you for sharing, Marija. I’m just starting woodworks. I hope I can do your workbench design. looks so well planned. 🙂